How to Repair Camper Walls
by John Cagney NashDamage to a camper which goes unrepaired will only invite greater problems. Camper manufacturers typically build their floors using a particle board which can separate after only one soaking, so walls must be inspected frequently and maintained as soon as a need is identified. As with most things, repair is usually much cheaper than replacement. Repairing camper walls can be a straightforward and easy project if the damaged area is free of obstructions and made from separate exterior and interior veneers filled with a loose mat of insulation.
Step 1
Remove any obstacle that will obstruct access to the wall, such as cabinets, curtain rails or furnishings. If a section of wall must be removed, peel away any wall covering that may complicate the project, such as stick-on tiles or wallpaper. Small areas of wall that need repair can sometimes be accessed through an open cupboard.
Step 2
Check to make sure there are no pipes or electrical wires buried in the section of wall you will be repairing. If there are, disconnect their services and then temporarily remove or reroute the pipe or wire.
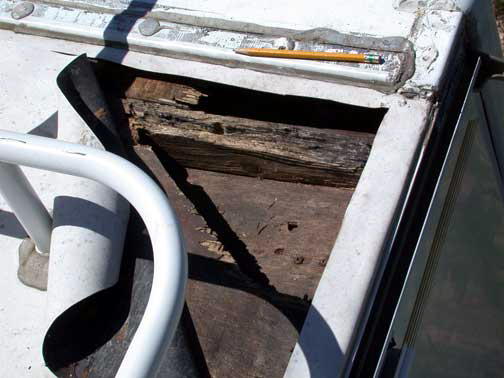
Step 3
Use a clear penetrating epoxy sealer (CPES) wood hardener if an area of wooden wall or wood-based paneling has delaminated or rotted. Follow all the information and instructions provided with the CPES wood hardener. Typically a two-part solution is mixed and applied to the damaged area, which wicks into the fibers of the wood and then sets up.
Step 4
Replace a section of damaged wall completely if your camper was manufactured using composite panels. Composite panels are glued together at the factory using a high-pressure glue, which forms together an outer skin, a layer of solid insulation, and an internal decorative finish. Partial replacement of any component of this system is not advised by the manufacturers.
Step 5
Use a sanding machine to smooth off the join between your repair and the surrounding walls. Try to recover the walls so as to match the surrounding walls, but if this is not possible make a feature out of the differences.
Step 6
Trim around any external joins using a decorative beading bedded into an extruded run of silicone sealant. This will both enhance the appearance of the repair and ensure the join is waterproof.
References
Tips
- If the cause of the damage was a prevailing problem -- such as a plumbing, window or roof leak -- as opposed to impact damage from a tree or fence, fix that issue before repairing the walls.
- For noncomposite walls, exterior skins are typically made of aluminum siding or a fiberglass-based paneling. Experts at any RV supplier or home improvement warehouse can be relied upon to give detailed advice on fitting and finishing either of these products.
Things You'll Need
- Carpentry toolkit
- Epoxy wood hardener
- Replacement composite panel
- Sanding machine
- Protective wear
Warnings
- Wear all necessary protective equipment, particularly a breathing mask when pulling out material damaged by moisture, and when sanding.
- If the repair is external, use proper stepladders to access the project.
Writer Bio
John Cagney Nash began composing press releases and event reviews for British nightclubs in 1982. His material was first published in the "Eastern Daily Press." Nash's work focuses on American life, travel and the music industry. In 1998 he earned an OxBridge doctorate in philosophy and immediately emigrated to America.


